Create and Manage Profile
|
ON THIS PAGE Show |
|
|
|
|
What is a profile?
A content ingest profile specifies the settings for downloading content. When you create a profile, you select entitlements for which you wish to download content and choose content file types and formats; for example, stories in NITF format or specific video renditions. You can also edit other settings; for example, the directory and folder structure for saving content.
How do I create a profile?
On the Agent Configuration Dashboard, click Create Profile, and then click New Profile.
On the Create Ingest Profile page, type the name of the profile in the Profile Name box.
On the Select Content tab, select the check box next to each entitlement that you want to download. Learn more >>
On the Content Options tab, select the file types and formats for downloading content; for example, you can choose to download specific video renditions or NITF-formatted stories. Learn more >>
On the Content Save Options tab, you can customize the directory for saving content, folder structure, file naming format and duplicate settings. Learn more >>
 Tip
TipThe settings that you specify on the Content Options and Content Save Options tabs are the default settings for downloading content for all entitlements. You can customize these settings for each entitlement by clicking Edit Settings on the Select Content tab. Learn more >>
Click Save at the bottom of the page to save your profile.
How do I select content?
On the Select Content tab, select the check box next to each entitlement that you want to download.
- To view and select entitlements by type, switch between the All, Followed Topics, On-Demand, Products and Packages tabs.
- Search by keyword, entitlement name or ID to narrow down the list of displayed entitlements. The search is not case-sensitive.
- To view only selected entitlements, click Show selected items only.
- To view all products included in a package, click See Products in Package to the right of the package ID. To select individual products in a package, select the check box next to each product that you want to download.
Click Save Profile at the bottom of the page to save your selections.
|
|
Make sure to select file types and formats that you wish to download. |
|
|
|
Can I select individual products included in a package?
Yes. On the Select Content tab, click the Packages tab, and then click See Products in Package next to the package name to view all products included in a package.
To select individual products in a package, select the check box next to each product that you want to download.
How do I select content file types and formats?
Click the Content Options tab and select the options under Files to choose the file types and formats for downloading content; for example, specific video renditions or NITF-formatted stories. In addition to saving content files, you can also choose to download metadata for individual content items or the entire feed.
|
|
For best performance, select only necessary file types and formats. |
|
|
|
Metadata
Video Tutorial
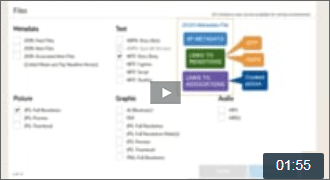
Agent Metadata Settings (01:55)
|
|
You can download metadata in addition to content files if you are interested in leveraging AP metadata to get the most out of the content delivered by the AP. For example, you can use AP category codes and other AP classification metadata to search or group content in your own systems. Learn more >> |
|
|
|
Content metadata is returned in the JSON format. To learn more, see Content Metadata Fields.
Downloading metadata files is optional. Typically, you will need to write a custom script to post-process the downloaded metadata files.
- If you post-process metadata files, you would typically choose to download either multiple content items in the same JSON file (JSON: Feed Files or one content item per file (JSON: Item Files).
- If you are interested in processing metadata for associated items (linked media and/or AP Top Headline stories), select JSON: Associated Item Files in addition to one of the other JSON file options.
JSON: Feed Files
Select this option to save feed files in JSON format (multiple content items are included in each feed file).
By default, feed files are saved in the <Agent
Directory>/feeds folder. The file name format is feed_<yyyyMMdd_HHmmss>_seq_<sequenceNumber>.json
where <yyyyMMdd_HHmmss> is the date and time when the
file was downloaded, and <sequenceNumber>
is a unique sequential number that identifies each feed item.
JSON: Item Files
Select this option to save item metadata files in JSON format (one content item per file).
By default, the item metadata files are saved below the <Agent Directory>/content directory. The file name format is <ItemID>--<Version>--<ContentID>-item.json.
JSON: Associated Item Files
Select this option if you are interested in downloading JSON metadata for any of the following associated items:
- Linked media (for example, pictures and video linked to text stories).
- AP Top Headline stories (individual Top Headline stories are delivered as associated items of the Top Headline parent item; for example, "AP Top News at 8:50 p.m. EDT", that identifies all of these stories)
- Media linked to Top Headline stories.
By default, the associated item metadata files are saved below the <Agent Directory>/content directory. The file name format is <ItemID>--<Version>--<ContentID>-associated_item.json.
Text
Text renditions (renditions of textual content) are different formats of the text content items (for example, NITF and ANPA version of a story) and textual descriptions of the media (for example, an image caption or a video script). Learn more >>
ANPA: Story Body
Select this option to save stories in ANPA format.
ANPA: Save All Versions
The same story in the ANPA format may be filed multiple times; for example, with a different category code. If you select this option, the agent will download all filings of ANPA-formatted stories.
|
|
Using this option might result in extra duplicates per product and is not recommended unless you previously configured saving all ANPA versions in WebFeeds Manager and require this particular configuration. |
|
|
|
NITF: Story Body
Select this option to save NITF-formatted stories.
If available, inline links are always included in NITF-formatted stories; for example:
<block id="Main">
  <p>BARCELONA, Spain (AP) - The rallying cry erupted, almost precisely, after 17 minutes and 14 seconds of soccer in the match between Barcelona and Malaga.</p>
  <p>
    <a href="https://www.youtube.com/watch?v=vMCg84QWNhs">"In! In-de! In-de-pen-den-ci-a!"</a>
  </p>
  <p>It rolled around and around the Camp Nou stadium like a tide, from behind one of the goals into a frothing chorus of thousands of voices.</p>
    ...
</block>
NITF: Caption
Select this option to save captions for pictures, graphics and video, including linked media captions.
The default file name format is <ItemID>--<Version>--<ContentID>_Caption.xml for captions of the pictures, graphics and video included in the feed and <ItemID>--<Version>--<ContentID>_Caption-associated_item.xml for linked media captions.
NITF: Script
Select this option to save video scripts, including the scripts of linked video.
The default file name format is <ItemID>--<Version>--<ContentID>_Script.xml for scripts of the video included in the feed and <ItemID>--<Version>--<ContentID>_Script-associated_item.xml for linked video scripts.
NITF: Shotlist
Select this option to save video shotlists, including the shotlists of linked video.
|
|
The script and shotlist are typically included in "NITF: Script". |
|
|
|
When a separate shotlist is available, the default file name format is <ItemID>--<Version>--<ContentID>_Shotlist.xml for shotlists of the video included in the feed and <ItemID>--<Version>--<ContentID>_Shotlist-associated_item.xml for linked video shotlists.
Media Renditions
Media renditions (renditions of non-textual content) are alternative versions of the same content item based on the format, size and/or other content characteristics, such as video frame rate and aspect ratio. For example, media renditions of a picture or graphic are the high-resolution, preview and thumbnail sizes of an image. Learn More >>
Select the check boxes for the media renditions (pictures, graphics, audio and video) that you want to download.
|
|
|
|
|
|
Are all media renditions available for all entitlements?
No, all renditions may not be available for certain entitlements. Although the AP offers a wide variety of potential media renditions, their availability for any given entitlement or content item is not guaranteed. Therefore, selecting certain renditions does not guarantee that you receive all of them; it only ensures that if the rendition is available, it is not filtered out. For example, you can select all video renditions, but the available video for a given entitlement or feed may include only MP4 files.
What are Content Save Options?
Video Tutorial
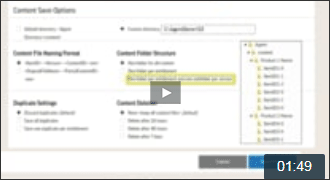
Agent Content Save Options (01:49)
Agent Directory
By default, the agent saves content in the <Agent Directory>/content folder (<Agent Directory> is the folder where the agent jar file is saved); for example: C:\Agent\content.
To save files in a different folder:
- On the Manage Ingest Profile page, click the Content Save Options tab.
- Click Custom directory and specify the path to the folder where you want to save content.
|
|
|
|
|
|
Content File Naming Format
<ItemID>-<Version>-<ContentID>.<ext> can be used to correlate downloaded content item components with their specific metadata in an item metadata file.
<ItemID> is a unique ID that remains the same throughout all revisions of the content item; for example, all stories that have the same item ID are part of the same 'story chain'. <ItemID> corresponds to the "altids.itemid" property in the JSON feed.
<Version> is the content item version number: typically 0 for the initial version, 1 for the first revision, 2 for the second revision and so on. The higher the number, the more recent the content item's version. <Version> corresponds to the "version" property in the JSON feed. Together with <ItemID>, <Version> may be useful for placing a story in the specific location in the 'story chain' if you are tracking all versions of the story for news management.
<ContentID> is a code that identifies a media rendition and corresponds to the "contentid" property in the JSON feed.
<ext> is a file name ending that designates the file format and typically consists of three alphanumeric characters (for example, .xml, .jpg, .pdf and .mpg).
<OriginalFileName>-<PartialContentID>.<ext> can be used to save files with original file names plus the last five digits of the <ContentID>; for example, EXAMPLE.JPEG-e68c0.jpg. This option helps prevent overwriting files saved with original file name. Files that have no original file name (for example, ANPA files) are saved with the file name in the format <ContentID>.<ext>.
Content Folder Structure
One folder for all content
All content is saved to the folder used for saving downloaded content (for example, to C:), and no subfolders are created:

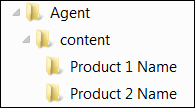
One folder per entitlement
One folder is created per product, package or Followed Topic, but no subfolders are created for individual content item versions; for example:
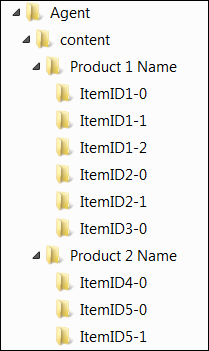
One folder per entitlement and one subfolder per version
|
|
This folder structure option is useful if you are downloading AP Top Headlines or if you would like to save each story version with its linked media (optionally, including JSON metadata files for this story version and each linked media item) in a separate subfolder. |
|
|
|
The agent creates one folder per entitlement below the folder used for saving downloaded content (for example, under C:) and subfolders for individual versions in each entitlement folder; for example:
|
|
The format of the version folder name is <ItemID>-<Version>. |
|
|
|
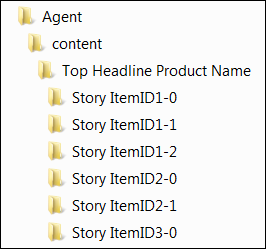
For AP Top Headlines, the agent creates one folder per entitlement (for example, AP Online Top General Headlines) below the folder used for saving downloaded content (for example, under C:) and subfolders for individual versions of each Top Headline story in each entitlement folder:
|
|
|
|
|
|
Duplicate Settings
What are duplicates?
Duplicate content is content that has been ingested more than once within a 24-hour period (the standard news cycle).
Duplicate content may be delivered for a variety of reasons; for example:
- AP Top Headlines are filed multiple times throughout the day, often with the same stories.
- AP editors may file the same story for print and online use.
- The same story or media may appear in multiple entitlements (products, packages or Followed Topics).
- Stories may share linked media; for example, the same picture may be linked to two different stories about the same news event.
How do I filter out duplicates?
By default, the agent does not ingest duplicate content.
How can I save duplicates?
On the Content Save Options tab, scroll down to the Duplicate Settings section and select one of these options:
To save all duplicates, click Save all duplicates.
To save one duplicate per entitlement, click Save one duplicate per entitlement.
TipThis option is useful if you are saving content for each entitlement in a different folder using the One folder per entitlement option on the Content Save Options tab.
|
|
This option is useful if you are saving each story version with its linked media in a separate subfolder using the One folder per entitlement and one subfolder per version option on the Content Save Options tab. |
|
|
|
Content Deletion
Deleting downloaded content files automatically after a certain time from the directory where they are saved cleans up older files, preventing them from exhausting disk space.
Does the agent automatically delete older files?
No. The agent does not delete older files by default.
How can I enable content file deletion?
On the Content Save Options tab, select one of these options under Content Deletion :
- Delete after 24 hours
- Delete after 48 hours
- Delete after 7 days
Customize Entitlement Settings
How do I edit entitlement settings?
You can edit settings for one or more individual entitlements that you selected on the Select Content tab.
|
|
The Edit Settings link appears only for selected entitlements after you save your profile. |
|
|
|
Click the Edit Settings link to the right of the entitlement ID to customize its settings, including Content File Options and Content Save Options.
Click Save Profile at the bottom of the page to save your changes.
How do I restore default settings?
To restore the default values for all settings in this entitlement, click Restore Default Settings at the bottom of the Entitlement Settings page.
Will editing default content settings affect customized entitlements?
No. If you later edit the default content settings, the customized entitlements will not be affected. The changes will apply only to entitlements that you have not customized.
How do I know which entitlements I have customized?
On the Select Content tab, the entitlements for which the settings have been modified are marked by a red warning icon next to the Edit Settings link:

Manage Profiles
How do I edit a profile?
|
|
You can edit any of the configuration settings in a profile at any time. Changes to configuration are applied to content ingestion during the next polling session. |
|
|
|
- On the dashboard, scroll down to the Content Ingest Profiles section.
- Under Options, click the Edit link associated with the profile that you want to edit.
- Make the changes on the Manage Ingest Profile page (the options are the same as those for creating a profile).
- Click Save at the bottom of the page to save your profile.
How do I delete a profile?
- On the dashboard, scroll down to the Content Ingest Profiles section.
- Under Options, click the Delete link associated with the profile that you want to delete.
- Click OK to confirm.
|
|
Since deleting a default profile is not allowed, unassign the default first. |
|
|
|
Export and Import Profiles
Can I export a profile?
Yes. If you would like to save a copy of your configuration profile to your machine (for example, as a backup copy), you can export the profile configuration settings as a JSON file.
To export a profile:
- On the dashboard, scroll down to the Content Ingest Profiles section.
- Under Options, click the Export link associated with the profile that you want to export.
- Save the profile JSON file to your machine. The default file name is in the format {Profilename}_{Datetime}.json.
How do I import a profile?
If you have previously exported a configuration profile from the AP Media Agent Configuration Dashboard to a JSON file or from AP WebFeeds Manager (WFM) to an XML file and saved it to your machine, you can import it to the AP Media Agent Configuration Dashboard. Learn more about migrating from AP WebFeeds Agent >>
To import a profile:
- On the Agent Configuration Dashboard, click Create Profile, and then click Import from File.
- Type the name of the profile in the New Profile Name box, and then click Choose File to browse to the previously exported profile JSON or XML file.
- Click Submit to import the profile. Once the profile is successfully imported, review the settings and make any necessary changes.
Default Profile
How do I set a default profile?
You can set a default profile to have all newly installed agents start ingesting content automatically with the same settings, which are specified in that default profile.
|
|
When you set a profile as a default, it is automatically assigned not only to all newly installed agents, but also to all existing agents that have not been assigned a profile yet. For example, if you have installed an agent, registered it on the Agent Configuration Dashboard and saved it with the blank row selected from the Content Profile drop-down list, the agent is automatically assigned a default profile once you set it as described below. |
|
|
|
To set a default profile:
- On the dashboard, scroll down to the Content Ingest Profiles section.
- Under Options, click the Assign Default link associated with the profile that you want to set as a default. The default profile is now marked as (default) in the Content Ingest Profiles section of the dashboard and in the Content Profile drop-down list.
|
|
The profile that was used as a 'template' for the default profile also appears in the Content Profile drop-down list. For example, if you set Sample Profile as default, both Sample Profile (default) and Sample Profile will appear in the Content Profile drop-down list. |
|
|
|
How can I unassign a default profile?
|
|
Unassigning a default profile removes the profile from all of the agents that are currently using it and causes those agents to stop ingesting. |
|
|
|
|
|
If you do not want to interrupt ingestion for those agents that are using the default profile, make sure to assign a different profile to them first, before unassigning the default profile. If you want to continue using the same settings as in the default profile, you can switch your agents to the profile that was used as the default profile 'template'. For example, for each agent that is now assigned Sample Profile (default), select Sample Profile from the Content Profile drop-down list and save the agent. Then you can unassign the default profile as described below. |
|
|
|
To unassign a default profile:
- On the dashboard, scroll down to the Content Ingest Profiles section.
- Under Options, click the Unassign Default link associated with the profile marked as (default).